Snow piles at the door, soggy boots by the heat vent, and a jumble of skis and river gear can make any entry feel chaotic fast. In Hot Sulphur Springs, you deal with snow, meltwater, grit, and summer river days that leave gear wet and messy. A well-planned mudroom changes everything. You’ll keep moisture contained, dry gear quickly, and make the most of a compact footprint while protecting your home’s finishes.
This guide walks you through smart layouts, durable materials, and drying strategies tailored to Hot Sulphur Springs living. You’ll learn what works in small spaces, how to handle drainage and radiant heat, and practical storage ideas for ski and river seasons. Let’s dive in.
Why mudrooms matter in Hot Sulphur Springs
Hot Sulphur Springs and greater Grand County see cold, snowy winters with frequent freeze–thaw cycles, plus warm summers filled with hiking, biking, and river time. That means heavy winter layers, bulky boots, and wet summer gear rotating through your entry. Your mudroom needs to manage moisture, speed up drying, and stand up to salt and grit.
Many homes here are compact, so every inch matters. A small, high-performing mudroom can protect floors and walls, keep odors in check, and make seasonal transitions easier. The goal is simple: control water first, dry gear second, and organize everything without eating up living space.
Plan your layout for small spaces
Choose the right location
Place your mudroom where you most often enter with gear. That could be the garage door, a rear entry from the driveway, or a door near trail or river access. A short wall or door that buffers the mudroom from living areas helps contain mess and odors. Sliding or pocket doors save space.
Compact layout options
- Pocket alcove conversion: Turn a closet or a slice of the foyer into a compact transition zone with built-ins and waterproof flooring.
- Linear corridor mudroom: Line one wall of a hallway with a bench, hooks, and shoe storage. This is perfect for small cabins.
- Utility and mud combo: Combine laundry with a mudroom so you can toss wet layers into the washer and hang items to dry. Add separation so wet items don’t crowd clean laundry.
- Dedicated wet zone: If space allows, include a small sloped floor and drain with full-height storage for skis, boots, and waders.
Size and clearance basics
- Circulation: Aim for at least 36 inches of clear passage.
- Bench: Seat height 16 to 19 inches with a 14 to 18 inch depth. Include under-bench cubbies or drawers.
- Cubbies: Plan 12 to 15 inches of width per person for shoes. Bump to 16 to 20 inches for bulky boots.
- Hooks: Two rows work well. Mount a lower row around 48 to 52 inches for kids and an upper row around 64 to 72 inches for adult coats and helmets.
- Universal access: If access is a goal, target a 60 inch turning diameter.
Light it right
Layered lighting makes arrivals easier. Use overhead lighting for general visibility and add task or under-cabinet lighting near benches and storage. Motion sensors help when your hands are full of gear.
Build a bulletproof wet zone
Floors that fight water
Your floor takes the brunt of snow, slush, salt, and grit. Choose materials that are waterproof or highly water-resistant, durable, and slip-conscious.
- Porcelain tile: Frost-rated, textured porcelain is tough and absorbs little water.
- Sealed natural stone or slate: Beautiful and durable with the right sealer and a slip-aware finish.
- Luxury vinyl plank or tile: Use a high-quality product rated for wet areas and cold entryways.
- Sealed concrete: Nearly indestructible and pairs well with radiant heat when properly sealed.
Avoid untreated hardwood in the wettest zones. If you have wood nearby, protect it with quick-dry rugs and waterproof mats.
Waterproofing and drainage
If you regularly bring in heavy meltwater, wet skis, or river gear, consider adding extra moisture control.
- Slope the floor to a small drain or grate where code allows.
- Install a waterproof membrane under tile to protect the subfloor.
- Add thresholds and good door seals to keep water from creeping into living areas.
- For tight retrofits, use a durable floor plus a bathtub-style containment area or a tray pan under the main drying zone.
Heat that speeds drying
A warm floor speeds evaporation and feels great after a ski day.
- Electric radiant: Thin heating mats or cables install easily under tile and are ideal in compact retrofits. A separate thermostat makes zoning simple.
- Hydronic radiant: PEX tubing tied to an efficient boiler is great for larger areas or whole-house systems. It has higher upfront cost and more complexity, but lower operating cost at scale.
For either system, include subfloor insulation and edge thermal breaks to avoid heat loss. Add a floor sensor for accurate control.
Controls, power, and permits
Electrical or plumbing changes for radiant heat, drains, or exterior heated surfaces typically need permits. Work with licensed pros who understand high-elevation performance and freeze–thaw conditions, and confirm requirements with the Grand County building department before you start.
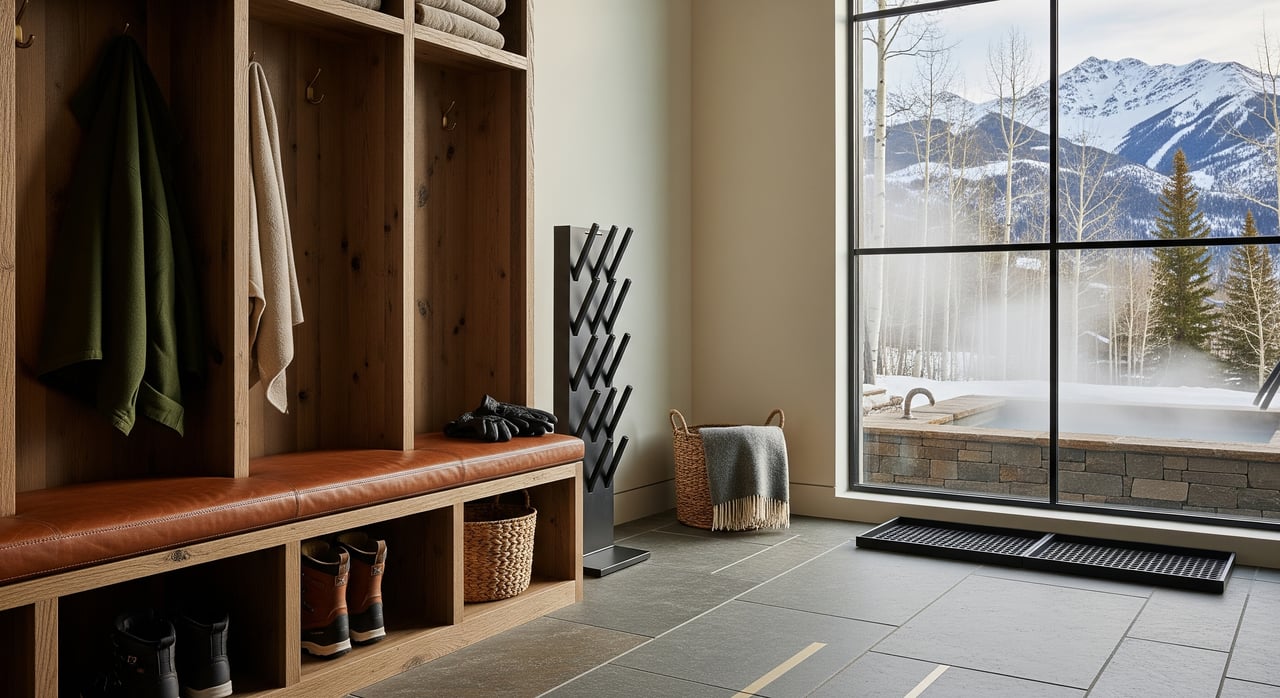
Storage that fits mountain gear
Boots and shoes
Wet footwear needs airflow and drainage. Choose sloped shelves, ventilated cubbies, or under-bench pull-out trays. Allow 12 to 15 inches of width per adult shoe slot and more for boots. A removable drip tray under the boot zone keeps floors cleaner.
Skis and snowboards
Use vertical wall racks, slim lockers, or horizontal racks for boards. Allow 5 to 8 inches of clearance per pair of skis. If you store wet skis inside, add a lined locker with drainage and a removable liner.
Outerwear and helmets
Two-tiered hooks keep daily coats accessible while making space for guests. Add a full-width hat and helmet shelf 12 to 16 inches deep. Pull-out or retractable rods help space out wet items so they dry faster.
Waders and river gear
Create a ventilated cabinet or a small drying closet with a drip tray for waders. Add an electric boot or wader dryer for quicker turnaround on back-to-back river days.
Small item organization
Use slim, sliding baskets for gloves, goggles, sunscreen, lip balm, and bug spray. Magnetic strips hold poles or tools. Door-mounted organizers work for lightweight items, but avoid overloading any door that serves as fire separation.
Use vertical space
Go floor-to-ceiling with shallow systems instead of deep cupboards. Build per-person stations that include a labeled cubby, a hook, and a boot space to prevent pile-ups. Overhead racks or lofted shelves hold off-season items. Prioritize safe access.
Durable materials and hardware
Pick corrosion-resistant hooks and hardware like stainless or powder-coated steel that can handle salt and moisture. If you want a padded bench, consider closed-cell or marine-grade foam. Use mildew-resistant paint and sealed joinery in wet areas.
Dry faster in our climate
Passive airflow
Good airflow speeds drying and cuts down on odors. Space out hooks, use slatted shelves, and keep vents clear. Separating wet gear from long-term storage prevents musty smells.
Active drying tools
When you need fast turnaround, active drying helps. Small forced-air cabinets, plug-in boot dryers, or a dedicated mechanical drying closet with gentle airflow can be worth it. Choose options with washable drip pans and simple controls for ease of use.
Odor and mold control
Ventilation is your best friend. Add occasional disinfection and use moisture-absorbing packets or desiccant boxes in cubbies. Stick with breathable materials wherever you store damp items.
Implementation paths and budgets
Quick wins that work now
- Add a waterproof runner or rug and a heavy-duty boot tray.
- Set up a freestanding bench with open cubbies and a row of hooks.
- Use plug-in boot dryers and labeled bins for small items.
These simple upgrades are affordable, fast, and usually do not require permits.
Mid-level remodel
- Install tile with electric radiant heat underfoot.
- Build in cabinetry with ventilated storage.
- Add targeted ventilation or a small exhaust fan in a drying zone.
Expect to use a licensed electrician and confirm permits for electrical work. This scope fits many compact retrofits.
Full remodel or new build
- Integrate hydronic radiant heating as part of a broader system.
- Add a sloped floor with a drain for heavy meltwater or waders.
- Create a purpose-built drying closet with tempered airflow.
Coordinate plumbing, HVAC, and structural pros. Pull required permits before work begins.
Maintenance made simple
- Clean and reseal grout or stone floors as recommended to maintain waterproofing.
- Check door thresholds and weather seals each season.
- Empty drip trays and clean or replace mats before they freeze in winter.
- Maintain dryers and fans per the manufacturer’s instructions and clear any lint or condensate.
Budget guidance
- Lowest cost: Runners, trays, hooks, and portable dryers.
- Moderate: Electric radiant under a small tile floor with basic built-ins.
- Highest: Hydronic radiant, plumbing a drain, and a dedicated drying closet.
Get multiple local quotes and confirm labor availability. Costs vary by scope and season.
Real-life layouts for HSS homes
4-foot entry alcove makeover
- Layout: A 48 inch wide alcove near the main door with a 16 inch deep bench and overhead shelf.
- Storage: Two-tier hooks behind the door, under-bench pull-out boot tray, and a slim vertical cabinet for helmets.
- Performance: A washable runner, textured porcelain tile, and a plug-in boot dryer keep water contained and speed drying.
6x8 laundry plus mud combo
- Layout: Stackable washer and dryer on one wall and a 6 foot bench with cubbies on the other. A partial-height divider shields the laundry from the wet zone.
- Storage: Per-person stations with labeled cubbies, two rows of hooks, and a ventilated cabinet for waders.
- Performance: Electric radiant under tile, motion-sensor lighting, and a small exhaust fan for odor control.
5x12 garage corridor mudroom
- Layout: A linear system with a 12 foot run of bench, tall lockers for skis and boards, and a shallow overhead shelf.
- Storage: Vertical ski racks spaced 6 inches apart, glove baskets, and a drip tray pan under the boot area.
- Performance: Sealed concrete with a slight slope at the boot zone, radiant-ready insulation, and a floor sensor for efficient heating.
Final thoughts and next steps
In Hot Sulphur Springs, the right mudroom is a daily luxury and a smart way to protect your home. Start with moisture control, add heat to speed drying, and tailor storage to ski and river seasons. If your project involves electrical, plumbing, or structural changes, confirm permits with the Grand County building department and work with licensed local pros who understand high elevation.
If you’re buying, remodeling, or preparing to sell, a compact, high-performance mudroom can boost livability and appeal. With design fluency, local insight, and concierge-level support, Roxanne “Roxy” King can help you prioritize upgrades that work for real mountain life. Contact Roxy to start your Winter Park mountain home search.
FAQs
Do I need a floor drain in a Hot Sulphur Springs mudroom?
- If you regularly bring in heavy meltwater, wet skis, or river gear, a drain is recommended. For lighter use, a durable waterproof floor plus trays can work.
What is the best heated floor option for a small mudroom in Grand County?
- Electric radiant mats are often the best fit for compact retrofits due to their thin profile and simple zoning. Hydronic shines in larger or whole-house systems.
How can I store skis and snowboards in a compact mountain entry?
- Use vertical wall racks or slim lockers with drip trays and allow 5 to 8 inches per pair of skis. Horizontal racks work well for boards in narrow spaces.
Can I combine a laundry room and mudroom in a Grand County home?
- Yes. Keep a separation between wet gear and the washer, add water-resistant finishes, and include a drain or tray pan if you expect lots of meltwater.
How do I dry waders and river gear without a big closet?
- Add a ventilated cabinet with a removable drip tray and use an electric boot or wader dryer. Keep airflow strong and space items apart.
What flooring holds up to road salt and grit in mountain entries?
- Frost-rated textured porcelain tile, sealed stone or slate, quality LVT/LVP rated for wet areas, or sealed concrete all perform well when maintained.
Do I need permits for radiant heat or drains in Grand County?
- Electrical and plumbing work typically require permits. Check with the Grand County building department and use licensed contractors experienced in cold climates.